How to add Extra Setting Options
Intro
I saw GrainOfSalt's 5-1 tutorial on gamebanana and it inspired me to create something like that myself. This tutorial focuses on more options to customize in your settings menu. The following things I will add in this tutorial are:
- Volume Slider
- FOV Slider
- Fullscreen Toggle
Setup: Setting up your options menu
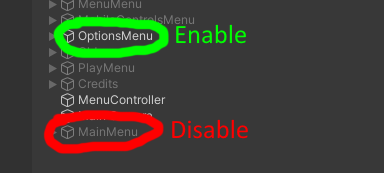
Go to the Main Menu Scene (Assets > Scene > Scenes > MainMenu). In your hierarchy, enable OptionsMenu and disable Main Menu
This will be your settings menu that you will change to your liking. We will transform it harder than uhh.. uhhh...
*checks notes*

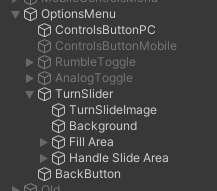
Let's just continue on. To make the future steps easier. I will put TurnSlideImage inside TurnSlider, enable ControlsButtonPC, as well as disable RumbleToggle and AnalogToggle. I suggest doing this as well
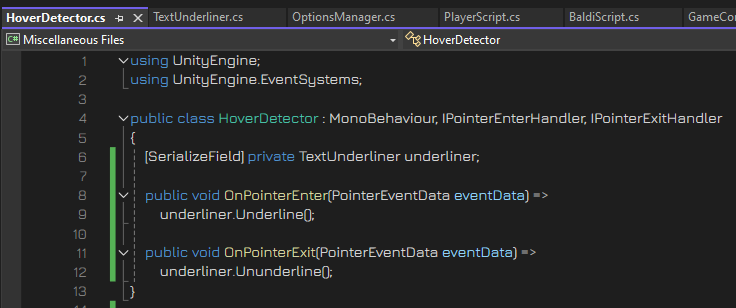
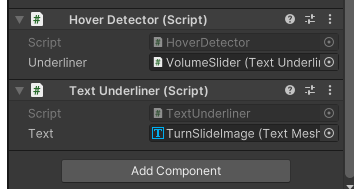
We are also going to create a new script for future use, Create a new script called HoverDetector and add this in
      using UnityEngine;
      using UnityEngine.EventSystems;

      public class HoverDetector : MonoBehaviour, IPointerEnterHandler, IPointerExitHandler
      {
          [SerializeField] private TextUnderliner underliner;

          public void OnPointerEnter(PointerEventData eventData) =>
              underliner.Underline();

          public void OnPointerExit(PointerEventData eventData) =>
              underliner.Ununderline();
      }
We will be using the TextUnderliner script to make things work. You can also use badrum's Improved Text Underliner script if you have other decorations on your script
Now that setup is done. It's time to actually add in some new options!
Step 1: Adding in the extra options (Volume, FOV, Fullscreen, and many more!)
Let's start with something that some mods may want! A volume slider to change the volume of the game without having to mess around with the Windows Audio Mixer
Step 1.1: Volume GameObject
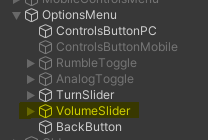
Duplicate the TurnSlider GameObject and change it's position to where ever you fit. Name the GameObject "VolumeSlider"
Step 1.2: Text Underline
Next part is to make it say "Volume" instead of "Turn Sensitivity". Because of how the GUI buttons work in this game, it's going to be a bit more trickier to handle this problem. So bear with me on this one
Step 1.2.1: TextMeshProUGUI
Find the VolumeSlider text GameObject and replace Image Component with TextMeshPro - Text (UI)

Now we change it so that it fits with the current text. Do the following:
- Set text to "TURN\nSENSITIVITY"
- Set Font Asset to COMIC_Pro
- Set Font Size to 30
- Set Vertex Color to Black
- Set both Horizontal and Vertical Alignments to Center and Middle respectively
.PNG)
If you do this right, the two slider texts should look similar to each other. This is to ensure everything is set up properly
.PNG)
Once you confirm they look the same (or close to same), Set the text to "VOLUME" (change positions if needed)
Step 1.2.2: Stitching everything together
In the VolumeSlider Inspector. Add both the HoverDetector and TextUnderliner scripts. Set the Underliner in HoverDetector to be the TextUnderliner, and the Text in TextUnderliner to be the Volume TMPro_Text component
Go to the Slider component and set Min Value to 0 and Max Value to 1
.PNG)
Now we are done with the visuals! Play the game to ensure that hovering over the Volume slider will make the text underlined
.gif)
Step 1.3: Functionality
Now we can actually add in the functionality! Go into the OptionsManager script
Step 1.3.1: Editing OptionsManager
Create a new Slider reference called volumeSlider
.PNG)
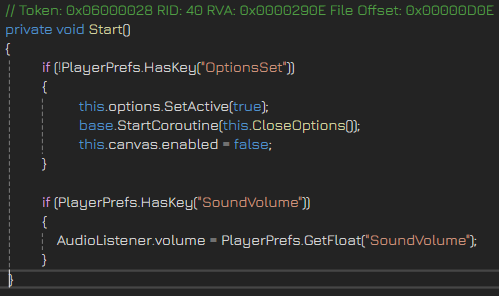
Go to the Start() function and add this line of code in
volumeSlider.value = PlayerPrefs.GetFloat("SoundVolume");
.PNG)
Then, go into the Update() function and add these line of code
      PlayerPrefs.SetFloat("SoundVolume", volumeSlider.value);
      AudioListener.volume = PlayerPrefs.GetFloat("SoundVolume");
.PNG)
Save the script and make sure to reference the volumeSlider
.PNG)
Step 1.3.2: DefaultSettingsScript + Playtesting
Go to DefaultSettingsScript and at the Start() function. Add this if statement
      if (PlayerPrefs.HasKey("SoundVolume"))
      {
          AudioListener.volume = PlayerPrefs.GetFloat("SoundVolume");
      }
Just so that things are immediately loaded in between sessions
Now it's time we playtest our script! Load up the game and test out the slider bar. Your volume should be adjusted with the slider! Now that's how you create a volume slider!
Step 1.4: Other Setting Options
Now we can add in the other options as well! Since we already made the volume slider, the rest should be easy from here!
Step 1.4.1: Creating a FOV Slider!
I have already explained how to create a slider. So just follow those steps!
.PNG)
You can clone the VolumeSlider GameObject to skip a few steps. Also make sure to change Min and Max Value to however you please (Though the range should include 70)
.PNG)
.PNG)
As for actually applying it. Open CameraScript and add this line of code in the Start() function
GetComponent<Camera>().fieldOfView = PlayerPrefs.GetFloat("FieldOfView");
.PNG)
.gif)
Step 1.4.2: Creating a Fullscreen Toggle!
We can also apply similar logic for toggles such as a Fullscreen! Though things may deviate a bit since we are dealing with a toggle instead of a slider
Duplicate the RumbleToggle GameObject. Repeat the same steps from the Sliders to achieve similar results. Change whatever when needed
.png)
(Note that there is no box included in this tutorial. Unless you want to figure out how to add one)
As for code implementation. We use GetInt instead of GetFloat
fullscreenToggle.isOn = PlayerPrefs.GetInt("Fullscreen") == 1;
.PNG)
(For the reference, use Toggle instead of Slider)
And as for updating. Instead of putting it on Update(), create a new function with the following contents
      public void ToggleFullscreen(bool toggle)
      {
          Screen.fullScreen = toggle;
          PlayerPrefs.SetInt("Fullscreen", toggle ? 1 : 0);
      }
.PNG)
Next. Go to the slider component and on the "On Value Changed (Boolean)", click on the plus icon to reference a function to run when the value is changed
.gif)
Drag in the OptionsMenu GameObject onto the "None (Object)" to have it be referenced. Then click on the "No Function" dropdown, hover over "OptionsManager", and find "ToggleFullscreen" from the dynamic bool area
.gif)
And of course, add this line of code in the DefaultSettingsScript
      if (PlayerPrefs.HasKey("Fullscreen"))
      {
      	  Screen.fullScreen = PlayerPrefs.GetInt("Fullscreen") == 1;
      }
.PNG)
Note that nothing will change whilst the game is being run on the UnityEditor. It would only work once you build your game
Step 1.4.3: Creating other stuff for your settings!
That isn't the only thing you can add in your settings. You can also add in other cool options however you desire! I just wanted to list down the things I want to see in more Baldi mods!
Problems and Answers
Q. I keep getting errors in the console when the settings is up
A. You probably forgot to actually reference the sliders. Make sure to do that

Q. Volume does not work with other scenes
A. Apply the same thing you did on DefaultSettingsScript to the other scenes. Ensuring that line of code is ran upon startup
Q. Fullscreen is not working
A. Some computers may not be compatible with such a change. Try doing this instead
Q. Main Menu is now stuck in Settings
A. In the Hierarchy. Disable OptionsMenu and enable MainMenu. You are done with this tutorial so you don't need to worry about this anymore